 |
This dialog box lets you create a new stereoscopic image from three
different sources:

| 1- |
|
You can create a new stereoscopic
image from two image files. This is the most usual case.
The aspect ratio can be imported from the left image file or it can
be specified directly. The Reset PPM button simply
reset both Horizontal and Vertical pixels per meter
values to 2952 pixels per meter (75 pixels per inch).
|
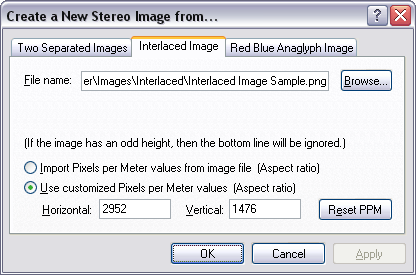
| 2- |
|
You can create a new stereoscopic
image from an interlaced image file. The left image is created
by using the even scan lines (0,2,4,...) and the right image is
created by using the odd scan lines (1,3,5,...). Almost all
the time the
left and right images, contained in an interlaced image file, have
only the half of the total horizontal scan lines of the stereoscopic
image they represent. In such case, in order to display correctly the stereoscopic image, you
must specify directly an aspect ratio
of 2:1 (HzPix : VtPix) like 2952:1476. You can also indicate
to import the physical size from the image file. The Reset
PPM button simply reset the Horizontal and Vertical
pixels per meter values to 2952 pixels per meter (75 pixels per
inch) and 1476 pixels per meter (37.5 pixels per inch) respectively.
|
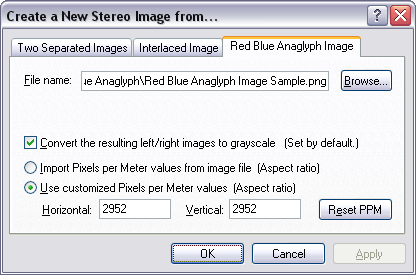
| 3- |
|
You can create a new stereoscopic
image from a red blue anaglyph image file. The left image is
created by using only the red component and the right image is
created by using only the green and blue components. The
result is that no green or blue lights are present in the left image
and no red light is present in the right image. So if you want
this stereoscopic image to be viewed in display modes other that the
red blue anaglyph display mode, you must select the Convert the resulting left/right images to grayscale
check box. The only case to not select this check box is
when you are creating a stereoscopic image using a pseudocolor
red blue anaglyph image file,
and you want to keep the pseudocolors. But in this last case,
the stereoscopic image can only be viewed correctly in the
Pseudocolor Red Blue Anaglyph
display mode. The aspect ratio
can be imported from the image file or it can
be specified directly. The Reset PPM button simply
reset both Horizontal and Vertical pixels per
meter values to 2952 pixels per meter (75 pixels per inch).
|
|
|